Wednesday, October 27, 2010

Beef Stew - All Wrapped Up

Reynolds Recipe
I found a recipe a few years ago that came with my Reynolds Wrap (Lowfat Beef Stew for Two).  My family and I love it but, I tweaked it a tiny bit for our family.  This is my verison:

Ingredients
  • 4 sheets (12 x 18-inches each) Heavy Duty Reynolds Wrap
  • 1 lb beef stew meat
  • 4 small red potatoes
  • 3 carrots
  • 2 celery stalks
  • 1 - 12 oz jar beef gravy
  • salt and pepper
Directions
  1. Preheat oven to 450 F.
  2. Cube potatoes.  Slice carrots and celery.
  3. Spray each sheet of Reynolds Wrap with non-stick cooking spray. 
  4. Center 1/4 potatoes, carrots, celery and beef stew meat on each sheet of Reynolds Wrap.  Then pour beef gravy evenly over each.  Add salt and pepper as desired.
  5. Bring sides of wrap together and then fold twice.  Fold in each end.  Leave some space in each pouch for heat to circulate.  Make a small opening in each pouch to release steam.  Be sure opening is facing up so liquids do not pour out.
  6. Place all four pouches on a cookie sheet and bake for approximately 30 minutes.
  7. Pour pouch contents into a large bowl, stir and serve.
*Delicious over rice or with bread on the side.

Monday, October 25, 2010

Garlicy Peas and Pasta

Ingredients
  • Spaghetti Noodles
  • Butter
  • 2-3 Garlic Cloves
  • Steamed Peas
  • Grated Parmesan Cheese
  • Salt and Pepper
Directions
  1. Cook spaghetti noodles as directed on box.  Drain water and set noodles aside for now.
  2. Crush 2-3 cloves of garlic.  Then, in the same pot the noodles were cooked in, saute the garlic in some butter 1-2 minutes.  Stir often to prevent burning.
  3. Add noodles back to the pot with the butter and garlic.  Mix until noodles are coated with garlic butter.  
  4. Add some peas, sprinkle with grated Parmesan cheese and add salt and pepper to taste. 
*To make a creamy sauce, add a couple of tablespoons of milk.
*I use left over peas from the dinner the night before.

Sunday, October 24, 2010

Motion Sickness to Morning Sickness - "It's In the Bag"

If you have ever had morning sickness or motion sickness, you know how embarrassing it is to get sick in front of an audience.  On top of that, the clean up can be a struggle since the smell can trigger another "episode". 

No, I do not have a cure but, I do have a recommendation to help prevent a mess and minimize embarrassment:  Momma's Chic Sicbags.  The creators came up with the idea to make these bags when their daughter became pregnant with their first grandchild.  Check out all these bags have to offer:
  •  Tabs for easy and secure closure. 
  • A cleansing wipe conveniently attached to the outside of each bag for easy clean-up.  
  • Small enough to keep in your purse, diaper bag, car or carry-on. 
  • Available in three cute designs:  Momma's Chic Sick Bags, Puke University Bags and Travel Sick Bags.
I took some Travelers Sick Bags with us on our last family vacation.  During our flight home we were glad to have them in our carry-on when our 15-month-old succumbed to the turbulence.  It made things much easier when we deplaned. 

Buy Momma's Chic Sicbags for yourself, your kids or as a great gift for an expecting mother.
   

Saturday, October 23, 2010

Sandra Lee's Bake Sale Recipes (or Holiday Treats)

Sandra Lee
I am a big fan of Sandra Lee on the Food Network, especially her show "Sandra's Money Saving Meals".  I was excited to see that today's episode was full of inexpensive bake sale recipes.  I only wish it had aired before the two bake sales I did last month!  However, these recipes are great for the holidays too!  They can be used as gifts or treats to have while company is over.   

You can find Sandra Lee's bake sale recipes at "Sandra's Money Saving Meals: Bake Sale".  They include:
There is also a shopping list ready to print for all your bake sale supplies.  And there are two "Round Two Recipes" you make with your remaining ingredients.

"Sandra's Money Saving Meals" is a great reference for a mom trying to stretch a dollar.  Her show airs on the Food Network.  Check your local listings for times.

Friday, October 22, 2010

Homemade Halloween Party

I found some great party ideas for Halloween online.  So if you plan on having a gathering at your home this Halloween, visit the links below for some great ideas:

Homemade Decorations
  1. Ghost Template - I printed this template out on white card stock.  I drew varying eyes and mouths on each ghost with a black sharpie.  Then I cut them out and taped them up around the house.
  2. Bat Template - I printed this bat template out on a sheet of white card stock and cut them out to create stencils.  Then I traced the templates onto black card stock with a pencil.  I made a bunch of these bats and taped them on our walls in groups of 5-8.  I put them in flying patterns.  The kids love it!
  3. Ghost Balloons - You only need 4 things - a black marker, white balloon, white crepe paper and clear tape.

family.go.com
Inexpensive Snacks
  1. Jack Skellington Cupcakes - As soon as my 7 year old son saw these, he immediately asked for them.  These will be the next thing I bake. 
  2. Witches Fingers in Bandages -  Sounds easy enough.  But I would probably try to use crescent rolls.  Cut the dough into strips for the bandages.  Also, if you can find Heinz's green ketchup, that would be fun for the "fingernail" part.
  3. Ghost Chips -  I'm not sure I would use all the seasoning suggested when making it for the kids.  A little bit of salt would probably be enough.

Halloween Crafts and Games
  1. Halloween Bingo - We did this last year and plan to again this year.  It's super easy to make and the kids had a blast.  Winners received Halloween coloring books for prizes.
    chocolate-candy-mall.com
  2. Lollipop Ghosts -  Super simple, inexpensive and cute! 
  3. Spirit Jugs - I hope to do this project this weekend.  We have tons of milk jugs waiting to be taken to the recycling center.  Why not use them one more time.
  4. Printable Halloween Games and Activities - FamilyFun.com has lots of fun things to do with your little goblins this Halloween and they are all free to print.

Multiple Kids and Bedtime

When I became pregnant with our baby girl, we had to move our two sons into the same bedroom.  However, instead of falling asleep on time like before, they would stay up all hours of the night playing.  We tried everything from lying down with them in their beds to taking turns sitting outside their door until they fell asleep.  But, they would still stay up late.  Finally, we decided to try staggering their bedtimes.  It was the best decision we ever made and now everyone is falling asleep on time and my husband and I have our alone time again.  This is our bedtime routine with our three children ("A" - 7 years old, "B" - 5 years old ("A" & "B" share a room) and "C" - 18 months:

6:15 pm
  • I give "C" a bath.
  • "A" and "B" pick out pajamas and then watch TV.  
6:30 pm
  • I brush "C"'s teeth, she goes potty and I put her pajamas on.
  • "A" and "B" shower with hubby's help.
6:45 pm
  • "C"'s story time with me in her room.
  • "A" and "B" brush their teeth, potty and get pajamas on.
7:00 pm
  • "C"'s bedtime.
  • "A"'s story time and prayers with hubby in bed (quality time).
  • "B" and I play quietly (Lego's, coloring, etc) in the family room.
7:30 pm
  • "A"'s bedtime.
  • "B"'s story time with Daddy in the family room (quality time).
8:00 pm (or whenever "A" falls asleep)
  • "B"'s bedtime.


*By waiting until "A" falls asleep before putting "B" to bed, we are able to keep them from playing with each other and staying up past their bedtime.
*We are able to have "B" (5 yrs) go to bed after "A" (7 yrs) because "B" goes to school later and gets to sleep in.  He also sometimes naps.  "A" has to wake up early to catch the bus and he no longer takes naps.  "B" also resists going to sleep while "A" usually welcomes sleep. 
*Do what works for your family.  Just be sure to be consistent or it won't work. 


(clipart from http://www.fotosearch.com/)

Thursday, October 21, 2010

Bedtime Routine

A bedtime routine can result in a more restful and less stressful night for everyone in the family.  Routines are great for kids.  When they know what comes next it's easier for them to transition.  So during your bedtime routine remind your child of what comes next (ex. "In 5 minutes we'll take a bath").  Stick with your routine and you will find that your nights will become more enjoyable.

Bedtime Tips:
  1. Make sure your child is active every day.  Active children fall asleep easier at bedtime.
  2. If you can, begin your bedtime routine at dinner.  Do not eat dinner in front of the TV.  Spend your meal as a family and talk about your day.
  3. Quiet activities (puzzles, coloring, homework, etc.) are best if you have time between dinner and bath.  But if your child tends to have energy to burn at this time of night, now is the time to let them get it out. 
  4. Calm you child with a warm bath.  Allow some playtime in the bathtub but no more than 15 minutes.  Remember, you want them to settle down now.
  5. Brush teeth, go potty/get a fresh diaper and put on pj's.
  6. Story Time.  Set a limit to how many stories or how long story time is before you begin.  You will be amazed at how early children learn to stall.
  7. Get them in the sleepy mood by turning out the lights but, leave a night light or hall light on.  Play some quiet music (use the same music every night) or a sound machine.  Give your child a comfort item (ex. blanket, stuffed animal) to sleep with. 
  8. Tuck your child in giving hugs and kisses and saying "I love you".
  9. If your child gets out of bed, immediately direct them back to their room and lay them down.  Say no more than "Goodnight, I love you!" and leave the room.  If your child continues to come out of their room, just repeat this step every time.  Eventually they'll give up and stay in bed.  If you are consistent, it should not take more than 2-3 nights to get them to go to sleep on time.  It is so worth it in the end. 
  • Choose a bedtime routine that works best for your family.
  • Have your child pick up toys before bath.  If you have them clean up after bath, you are exposing them to toys that they can't play with and that's just asking for a struggle.
  • It is a good idea to lay out pj's before bath.  This way you don't waste time during your bedtime routine deciding on what your child will wear to bed.  If your children are older, have them do this task.
  •  Begin your bedtime routine at least one hour prior to your child going to sleep.  This should allow enough time for each step.  
    • Bath - 20 minutes
    • Brush Teeth, Potty/Diaper and PJ's - 10 minutes
    • Story Time - 30 minutes maximum
    • Lights out, Hugs and Kisses - 5-10 minutes
Helpful Links:
Helpful Tools:

Wednesday, October 20, 2010

Ghostly Halloween Decorations

Easily make your own ghosts to haunt your house this Halloween.  All you need is:

Supplies
  • white balloons
  • clear tape
  • white crepe paper/streamers
  • black permanent marker
Directions
  1. Blow up a white balloon and tie off the end.
  2. Draw a ghostly face on the balloon with the black marker.
  3. Tear white crepe paper into 6-8 strips that are about 10-12 inches long.
  4. Using the clear tape, adhere the strips to the bottom of the balloon.
  5. Tape your ghosts to walls, ceilings, etc. to create your own haunted house.
*You can also use this technique to make an octopus.  Use purple or blue balloons and crepe paper in place of the white.
*Use helium to help your ghosts float.  After a day or so they will start to float mid-air, making them a little more creepy!

Tuesday, October 19, 2010

Halloween Crafts and Decorations

Family Fun - Jeepers Creepers Pumpkin
You can never have too many Halloween decorations - at least that's what my kids think.  But, this year it seems Halloween decorations are expensive as ever!  I was happy to find a nice selection at our local Dollar Tree but I didn't find everything the kids and I wanted.  So, I searched the internet to find decorations we can make at home.  Here are the websites I like best for Halloween crafts, decorations and snack ideas:

Links
Have fun creating a Halloween of your very own.  I hope you and your little ghosts and ghouls have a Happy Halloween!

Sunday, October 10, 2010

Hawaiian Shoyu Chicken

Ingredients
  • 1 ¼ cup Shoyu Sauce (or soy sauce)
  • 1 cup Light/Dark Brown Sugar
  • 1 cup Water
  • 5 lbs Chicken Thighs
Directions

  1. Mix Shoyu sauce, brown sugar and water in a bowl until the sugar is completely dissolved. 
  2. Remove all skin and visible fat from chicken thighs. 
  3. Make one shallow cut on each side of the chicken thigh bone on the underside of the chicken.  Do not cut all the way through. 
  4. Place chicken in a pot or deep skillet.  Pour all shoyu mixture over chicken.  Bring to a boil.  
  5. Lower to a simmer for 30-40 minutes.  Stir often.
  6. Remove from heat when sauce thickens and meat begins to fall off the bone.
  7. Place chicken on plate (or on top of white rice) and pour sauce over chicken.
*Increase brown sugar for a sweeter sauce.  Decrease Shoyu sauce for less salty taste.

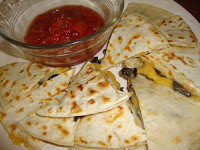
3 Ingredient Quesadillas

Ingredients
  • Mexican/Fiesta Blend Shredded Cheese
  • Flour Tortillas
  • Sliced Black Olives (or toppings of your choice)
Directions
  1. Spray pan with non-stick cooking spray.  Heat to medium/medium high.
  2. Place one flour tortilla in pan.  Cover with a layer of cheese.  Sprinkle black olives and a little more cheese over black olives (this will help hold quesadilla together when second tortilla is added).
  3. When cheese is mostly melted, add second tortilla on top.  While holding the second tortilla in place, carefully flip the quesadilla. 
  4. Cook for 30-45 seconds.
  5. Remove from pan and let cool for 1-2 minutes.  Slice then serve.
*Salsa, sour cream and/or guacamole are great for dipping.
*You can add as many toppings as you like - diced tomatoes, avocados, shredded/diced chicken, etc.

Thursday, October 7, 2010

Phineas and Ferb Cupcake Toppers

Phineas and Ferb are a big hit with a lot of kids right now but it's difficult to find any party supplies in the stores.  So, when my son asked for a Phineas and Ferb theme for this 7th birthday party, I had to become creative and make my own cupcake toppers.  These were sent to school for his classroom party.

Supplies
Directions
  1. Print colored Phineas and Ferb clip art on white card stock.
  2. Cut out each image leaving 1/4" white border around picture.
  3. Place cut out image over colored card stock.  Cut colored card stock enough to have 1/4" of colored border.
  4. Apply glue stick to back of cut out image.  Sandwich the toothpick between the cut out image and the colored card stock.  Rub the card stock around the toothpick to make secure.  
  5. Let glue dry.  Insert your cupcake toppers into cupcakes. 
*Check out the Perry the Platypus Cake I made for his birthday party at home.

Phineas and Ferb Birthday Cake

I couldn't find a store that made Phineas and Ferb birthday cakes let alone Perry the Platypus cakes, so I had to make my own.  Below is the technique I used to make a custom made cake for my son.  You too can use this method with any image your child likes.  Enjoy and have fun!
  • Cake
  • 2 Cans of White Frosting
  • Coloring Page/Image
  • Wax Paper
  • Tape
  • Black Decorating Gel
  • Cake Decorating Bags & Tips/Plastic Sandwich Bags
  • Food Coloring
  1.  Make your cake following the recipe and frost with white frosting.
  2. Find a black and white coloring page of the cartoon character or picture you would like to have on your cake.  (This can be from a coloring book or found online and printed from your computer.  Be sure it is an image that will fit on your cake.)
  3. Tape the coloring page to a hard surface (kitchen counter/table).  Place a larger piece of wax paper over the coloring page and also tape it down too.
  4. Trace the outline of the coloring page onto the wax paper with black decorating gel (in a tube).
  5. When done, carefully remove wax paper from hard surface and flip it over so that the black gel is facing the top of the cake. 
  6. Gently lay the wax paper on top of the cake (keep in mind where you would like the image to be on  your cake. 
  7. Carefully trace your finger on the back of the wax paper along the black gel lines.  (This will transfer the black outline of your image onto the cake without transferring the cake frosting onto the wax paper.)
  8. Slowly peel away the wax paper from the cake.  Now you have an black outline of your image on your cake.
  9. Fill in the image with colored frosting (made with white frosting and food coloring).  You can use cake decorating bags and tips or a plastic sandwich bag with one of the corners slightly snipped off to pipe on the frosting.   
*If you are using an image with words, make sure you reverse it before tracing it onto the wax paper.  This way when you flip the image to transfer it to the cake, the words will be in the correct direction.
*I also made Phineas and Ferb Cupcake Toppers for the cupcakes I sent to school for his classroom party.  Click on the link to find out how.

Easy Tuna Melt

Ingredients
  • 8 slices of french bread
  • 2 cups finely shredded cheddar cheese
  • 12 oz can tuna
  • 2 tblsp relish (or celery)
  • 1 1/2 - 2 tblsp mayonnaise
  • salt and pepper (optional)
Directions
  1. Preheat oven broiler on low setting.
  2. Drain tuna.  Mix tuna, mayo and relish in a bowl.  Add salt and pepper to your liking.
  3. Place bread on cookie sheet and toast under broiler for 1-2 minutes.
  4. Let toast cool.  Remove from cookie sheet and put on a plate.  
  5. Add a layer of tuna mixture and 1/4 cup of cheese on each piece of toast.
  6. Return toast (now covered with tuna and cheese) to cookie sheet.  Cook under broiler for another 2-3 minutes or until cheese has melted and begun to brown.
  7. Remove from oven and sprinkle with paprika.
  8. Cool and then serve.
*You can substitute shredded cheddar cheese with sliced American cheese or any other cheese of your choice.  You can substitute french bread with sandwich bread.
*Use any remaining tuna mixture for tuna salad sandwiches or a cracker spread.